I'm a little late in posting items this week and I missed some posts last week. Work has been very busy and earlier this week things got messed up a bit because Rich had to travel. He was supposed to fly out to Greenville, SC on Monday, but first his flights were delayed and then cancelled. He was re-booked for a flight at 6am on Tuesday. Yuck!!
So here's what I was supposed to do last week ;-)
1. Post for Wanna-Know Wednesday. Missed. :-(
2. Share directions for building a design wall. Also missed. :-(
3. Sew the background pieces to the finished Lone Star. DONE!
4. Finish hand-sewing the binding onto the mug rugs. DONE!
5. Post for Stash Busting Sunday. DONE!
Since its already Wednesday, I'm not going to put a full list of what I plan on doing this week. I'm going to attempt to post for Wanna Know Wednesday, but I have to download some pictures first.
1. Post of Wanna-Know Wednesday.
2. Sew borders to Lone Star quilt.
3. Post for Stash Busting Sunday.
Hope everyone is having a good week!
Happy Crafting!
~Sarah at upstateNYCreations
Wednesday, June 27, 2012
Sunday, June 24, 2012
Stashbusting 2012 - Week 26
A little bit of sewing done this week. A lot of outdoor work this week. ;-) We did get the rest of the materials to make a design wall. And I was able to get the entire center section of the lone star done along with attaching the background pieces. Here's what the design wall looks like along with the center portion of the star:
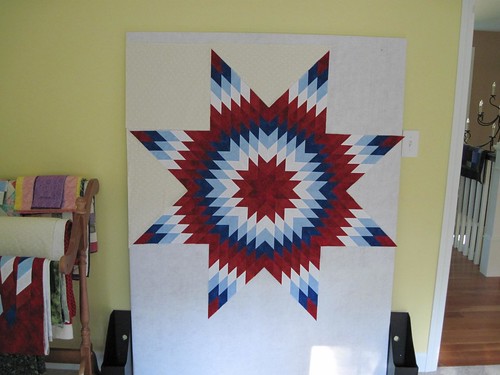
A duplicate design wall (same size) will eventually be right next to this one...so my design wall will be 8 feet wide by about 65" tall.
I cut the first set of borders to go around the star (dark blue), but I don't have any pictures of it yet. That's where my "stash used" comes from this week.
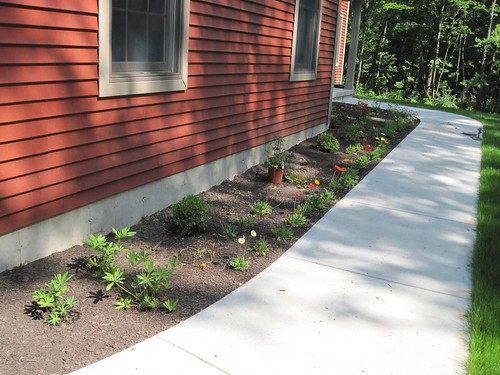
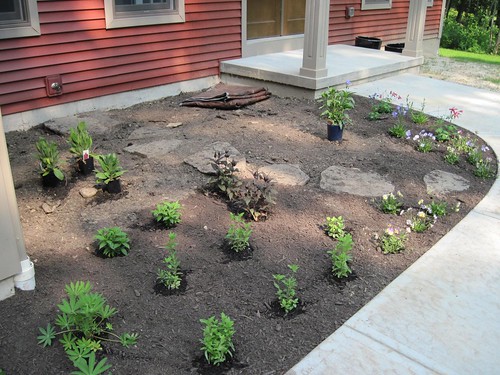
Here's also what the garden looks like now with all the plants in place:

Here are the numbers:
Added This Week: 0.0 yards
Added Year to Date: 15.54 yards
Used This Week: 0.49 yards
Used Year to Date: 14.09 yards
Net Year to Date: 1.45 yards
Go on over to Patchwork Times to see how everyone else is doing.
Happy Crafting!
~Sarah at upstateNYCreations
A duplicate design wall (same size) will eventually be right next to this one...so my design wall will be 8 feet wide by about 65" tall.
I cut the first set of borders to go around the star (dark blue), but I don't have any pictures of it yet. That's where my "stash used" comes from this week.
Here's also what the garden looks like now with all the plants in place:
Here are the numbers:
Added This Week: 0.0 yards
Added Year to Date: 15.54 yards
Used This Week: 0.49 yards
Used Year to Date: 14.09 yards
Net Year to Date: 1.45 yards
Go on over to Patchwork Times to see how everyone else is doing.
Happy Crafting!
~Sarah at upstateNYCreations
Monday, June 18, 2012
Make-a-List Monday
Happy Monday everyone!
I'm attempting to be upbeat that its Monday, despite the fact that I have to go to work today. ;-)
Last week was a fairly decent week in terms of completing the items that I wanted to get done.
1. Post for Wanna-Know Wednesday. DONE! Posted step 2 for the Lone Star quilt.
2. Share directions for next step of Lone Star wall hanging. Done! Posted step 2.
3. Finish sewing the center portion of the Lone Star wall hanging. Done! I still need to add the background pieces though.
4. Complete binding of the mug rugs. Somewhat done. I machine sewed the binding on, but I need to finish the hand-sewing.
5. Post for "stash busting" Sunday. Done!
This past weekend was busy, so I didn't get nearly as much sewing done as I would have liked. We went to visit my parents this weekend, which killed pretty much all of Saturday. We did stop at the Harden Furniture Factory store on the way there since its less than 10 minutes from my parents. We wanted to see more of their dining room furniture in person and sit in some of the chairs to see how they felt.
Sunday was spent doing the usual (grocery shopping, laundry) as well as planting the last of our plants. We received the final plants on Saturday (9 plants total). Those were put in the ground Sunday afternoon and we finished mulching the planting bed. The only spot we have left is where we have to build and install a trellis before we can plant a clematis. We have all the materials to build the trellis, but we need to paint it first before we start to put it together. I think I'm going to be doing some priming this week!
So here's the plan for this coming week:
1. Post for Wanna-Know Wednesday.
2. Share directions for building a design wall.
3. Sew the background pieces to the finished Lone Star.
4. Finish hand-sewing the binding onto the mug rugs.
5. Post for Stash Busting Sunday.
Happy Crafting!
~Sarah at upstateNYCreations
Sunday, June 17, 2012
Stashbusting 2012 - Weeks 24 & 25
Happy Father's Day to all those Dad's out there!
I was able to do some sewing these past two weeks. A lot of it was sewing items where I've already counted the fabric usage, so the numbers haven't changed too much.
I did get the entire center section of the Lone Star Quilt done. I've also been posting tutorials on how to make a Lone Star quilt. So far, I've posted Part 1 and Part 2. I think when its all said and done, there will be four posts.
I spent most of today with Rich working on our garden. The last of our plants arrived yesterday, so we finished planting the last 12 plants this morning/afternoon. We have one more to plant, but we need to get a trellis built first.
Here are the numbers:
Added This Week: 0.0 yards
Added Year to Date: 15.54 yards
Used This Week: 1.00 yards
Used Year to Date: 13.60 yards
Net Year to Date: 1.94 yards
I'm so close to be in the black again! :-)
Happy Crafting!
~Sarah at upstateNYCreations
Wednesday, June 13, 2012
"Wanna Know" Wednesdsay - Lone Star Tutorial Part 2
Its Wednesday again, which means its time for the next installment of how to make a Lone Star quilt. I apologize to anyone who is on a dial-up connection as this is definitely a picture-heavy post.
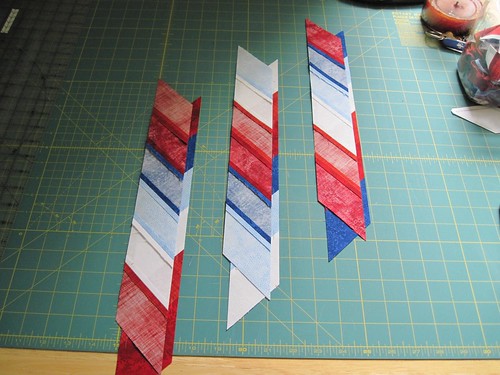
Last time, we left off with having all of the strips cut at a 45-degree angle and laid out in the order needed for assembling the diamonds.
The next step is to mark your seam intersections. Now...I know you really don't want to mark all these strips....but trust me, its definitely worth the extra time to mark everything. I learned this the hard way (don't even ask how many times I had to rip out seams to get these right).
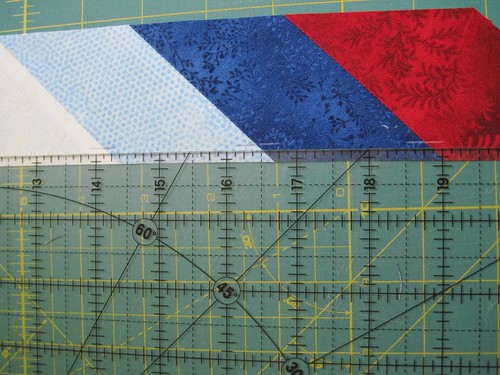
So take your ruler and line up your 1/4" mark next to the edge of the fabric. The key thing is that you want the actual 1/4" line to the left of the fabric as shown in the picture below. This will make sure that your marks aren't visible once you sew the pieces together.
Below you can see where I marked just the intersection points between the fabrics. You don't need to draw a line along the length of the strip. You just need it where a seam exists.
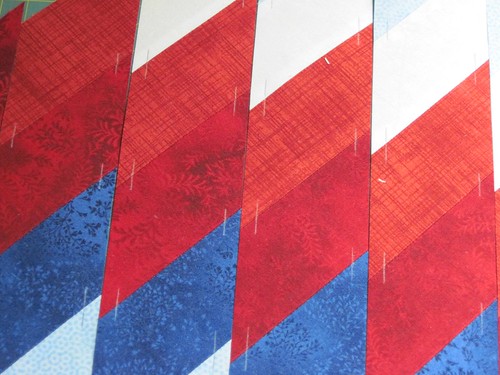
Here's another picture with both light and dark marks (sorry about it being sideways).
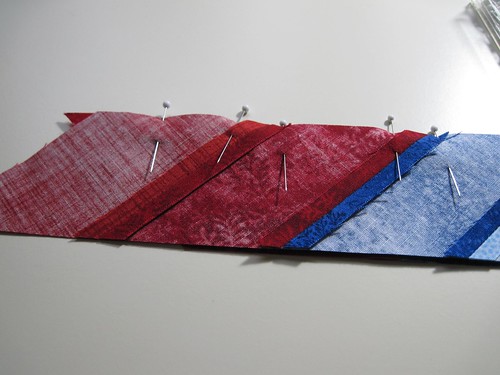
Mark both sides of all of your strips as shown in the pictures below.

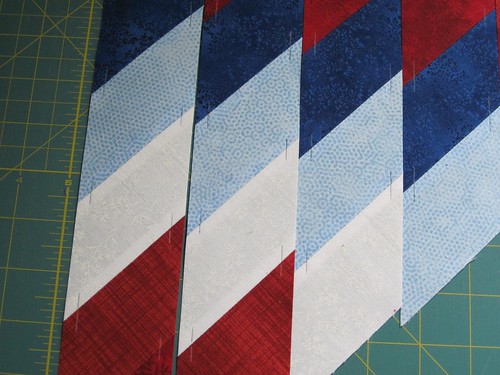
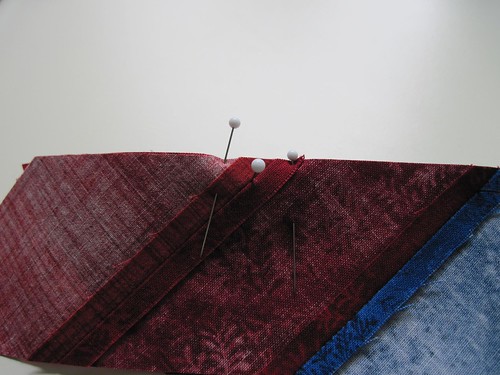
Up close showing the seam intersections:
Once you have all your seams marked, take your strip on the right side of a pair, and flip it over the first strip.
Now its time to start pinning. Take the top strip and place a pin from back to front.
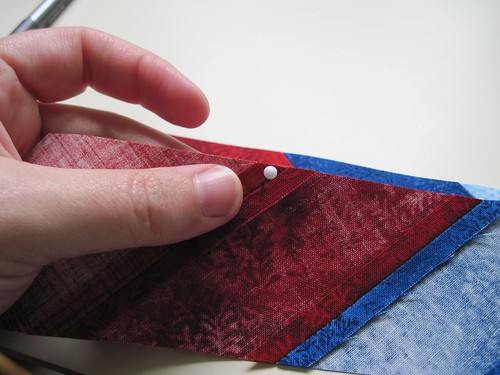
Make sure the point of the needle pokes out through the marked intersection.
Next, with the same pin, but the point of the pin through the marked intersection on the bottom strip.
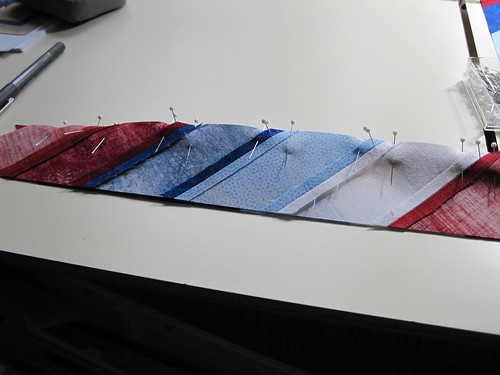
Insert these "vertical" pins through every intersection along the strip.
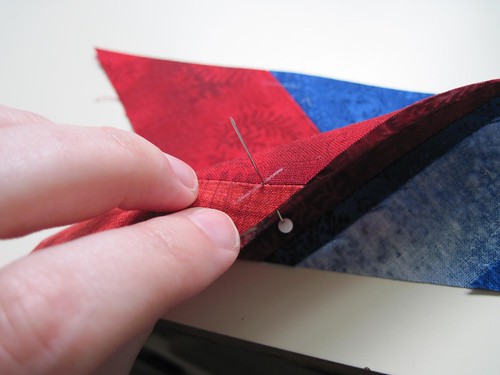
Once you have all the vertical pins placed, shift the fabric around such that the pin is perfectly straight and the top edges line up as closely as possible. Then take two other pins and pin on both sides of your intersection pin.
Do this for the entire strip.
Once you have the second set of pins in place (on both sides of the intersection pin), you can remove the intersection pin. I also placed a halfway between the end of the strip and the first intersection. This is just to help keep the fabrics aligned when I start to sew the strip.
Go ahead and sew all those strips together and remove the pins as you are sewing. Press your seams open and keep repeating the steps above until you have a full diamond sewn together. I don't have a picture of a single diamond together, but just imagine that the pair below are separate. ;-)
Happy Crafting!
~Sarah at upstateNYCreations
Last time, we left off with having all of the strips cut at a 45-degree angle and laid out in the order needed for assembling the diamonds.
The next step is to mark your seam intersections. Now...I know you really don't want to mark all these strips....but trust me, its definitely worth the extra time to mark everything. I learned this the hard way (don't even ask how many times I had to rip out seams to get these right).
So take your ruler and line up your 1/4" mark next to the edge of the fabric. The key thing is that you want the actual 1/4" line to the left of the fabric as shown in the picture below. This will make sure that your marks aren't visible once you sew the pieces together.
Below you can see where I marked just the intersection points between the fabrics. You don't need to draw a line along the length of the strip. You just need it where a seam exists.
Here's another picture with both light and dark marks (sorry about it being sideways).
Mark both sides of all of your strips as shown in the pictures below.
Up close showing the seam intersections:
Once you have all your seams marked, take your strip on the right side of a pair, and flip it over the first strip.
Now its time to start pinning. Take the top strip and place a pin from back to front.
Make sure the point of the needle pokes out through the marked intersection.
Next, with the same pin, but the point of the pin through the marked intersection on the bottom strip.
Insert these "vertical" pins through every intersection along the strip.
Once you have all the vertical pins placed, shift the fabric around such that the pin is perfectly straight and the top edges line up as closely as possible. Then take two other pins and pin on both sides of your intersection pin.
Do this for the entire strip.
Once you have the second set of pins in place (on both sides of the intersection pin), you can remove the intersection pin. I also placed a halfway between the end of the strip and the first intersection. This is just to help keep the fabrics aligned when I start to sew the strip.
Go ahead and sew all those strips together and remove the pins as you are sewing. Press your seams open and keep repeating the steps above until you have a full diamond sewn together. I don't have a picture of a single diamond together, but just imagine that the pair below are separate. ;-)
Next week, I'll show how to sew the diamond sections together to achieve the Lone Star shape in the middle.
~Sarah at upstateNYCreations
Monday, June 11, 2012
Make-a-List Monday
Happy Monday!
I was able to do some sewing last week and over the weekend (i.e. Friday night). Rich went climbing on Friday evening, so I had the whole house to myself and spent all evening sewing! :-)
Here's what I was able to accomplish last week:
1. Post for Wanna-Know Wednesday. DONE! I posted the start of a series of tutorials on making a Lone Star Quilt.
2. Share more pictures of Lone Star Wall Hanging. DONE!
3. Post initial set of directions on how to make a Lone Star quilt. DONE!
4. Purchase materials for design wall. DONE! Rich bought all the materials yesterday at the local hardware store. We did have to order the cord board from none other than Amazon, but that should get here in another week or so. I'll post something about how we're making it and how successful it is! ;-)
5. Quilt small "mug rugs" that I've had made for a while. DONE! I quilted these Thursday evening and put the binding on Friday evening. I still have to hand-sew the binding, but hopefully that won't take too long.
All in all, it was a fairly good week. I didn't get as much sewing done as I would have liked over the weekend. We went furniture shopping on Saturday. We didn't actually purchase anything, but we were looking around to see what was available in terms of a dining room table and a pub table for the kitchen. I think we fell in love with a dining room table, but of course, its pretty darn expensive. Since its a "nice to have" and not a "must have" right now, we're in no rush to actually purchase it. Its an Amish-made table, which is pretty neat. Plus, its absolutely beautiful. Every style of chair that we sat in by this "company" was comfortable. I could sit for hours in those chairs, even though there was no padding on them...they are THAT comfortable.
I was able to do some sewing on the Lone Star quilt and have only 3 more seams to sew before the entire center portion of the pattern is done (i.e. the Lone Star portion). I laid out the individual diamond sections on the floor yesterday and it looks really good. I can't wait to actually get the quilt made.
So here's the plan for this week:
1. Post for Wanna-Know Wednesday.
2. Share directions for next step of Lone Star wall hanging.
3. Finish sewing the center portion of the Lone Star wall hanging.
4. Complete binding of the mug rugs.
5. Post for "stash busting" Sunday.
Happy Crafting!
~Sarah at upstateNYCreations
Friday, June 8, 2012
Earth-Works Projects
Since we live on a well at the new house, we decided to get a little "creative" with watering the grass and plants. We honestly have no idea yet how the well will do in the summer as one of our neighbors routinely runs their well dry. Hopefully we are not in the same aquifer as them!
Our lawn is brand new this year, which means LOTS of watering. Thankfully, so far we've had enough rain that we've only had to water a few times. We have a small stream that runs on the northern side of our property. The "stream" is made purely because the farmer across the road got tired of his fields flooding and convinced the town/state to put a culvert under the road and just dump the water onto our property. Wonderful!
So since its not a "natural" stream, we have no problems damming it up for our own use! :-) Some water still does leak through and when the water level is over a certain amount, it flows through a pipe and goes down hill anyway. Here's what our dam looks like:
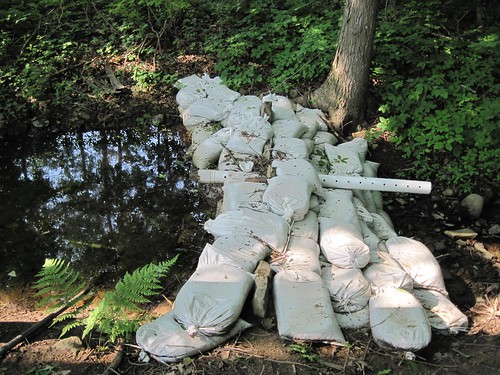
Lots of sand bags from Amazon (you can get anything from Amazon!) and a leftover piece of drainage pipe make our dam. On the left hand corner of the picture, you can see a black pipe. This is the pipe that goes from the reservoir to the pump. We're pretty psyched that this system actually works. We've been able to water our grass a handful of times and the only thing we've used from the house is electricity to run the pump.
We've also used this to water our garden so far, which is pretty handy. Eventually, we think we'll be able to run a soaker hose to the garden and just hook it up when we need to water. However, at this point, we're going to wait to see how much water/rain we get in a summer and whether this area will completely dry up or not. If it dries up a lot, then there's no point in investing in more hoses and such to water the plants.
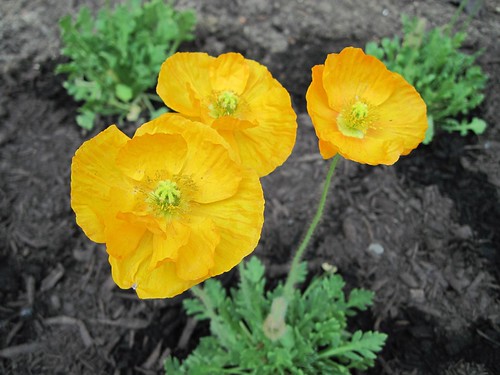
And because I feel like this post needs some color to it....
Happy Crafting!
~Sarah at upstateNYCreations
Our lawn is brand new this year, which means LOTS of watering. Thankfully, so far we've had enough rain that we've only had to water a few times. We have a small stream that runs on the northern side of our property. The "stream" is made purely because the farmer across the road got tired of his fields flooding and convinced the town/state to put a culvert under the road and just dump the water onto our property. Wonderful!
So since its not a "natural" stream, we have no problems damming it up for our own use! :-) Some water still does leak through and when the water level is over a certain amount, it flows through a pipe and goes down hill anyway. Here's what our dam looks like:
We've also used this to water our garden so far, which is pretty handy. Eventually, we think we'll be able to run a soaker hose to the garden and just hook it up when we need to water. However, at this point, we're going to wait to see how much water/rain we get in a summer and whether this area will completely dry up or not. If it dries up a lot, then there's no point in investing in more hoses and such to water the plants.
And because I feel like this post needs some color to it....
Happy Crafting!
~Sarah at upstateNYCreations
Wednesday, June 6, 2012
"Wanna Know" Wednesdsay - Lone Star Tutorial Part 1
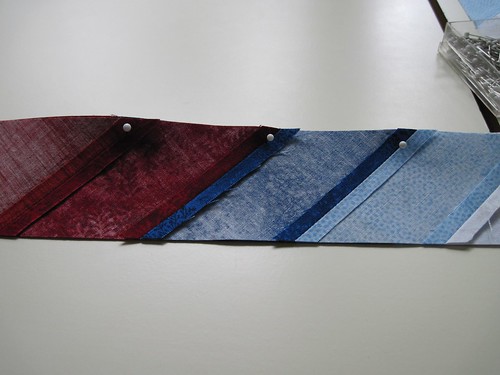
For this week's "Wanna Know" Wednesday, I'm posting some directions (with lots of pictures) on how to start making a Lone Star Quilt.
This quilt is going to be 67" x 67" when finished. I will post a picture of what the overall design will look like later. The center portion is approximately 48" square (if I recall correctly). I don't remember exactly what the fabric requirements are, but I can give more details on the size of the finished items if people are interested.
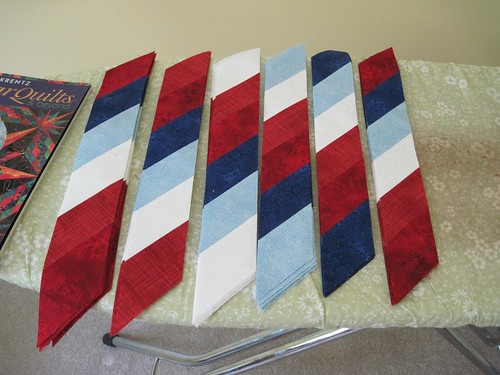
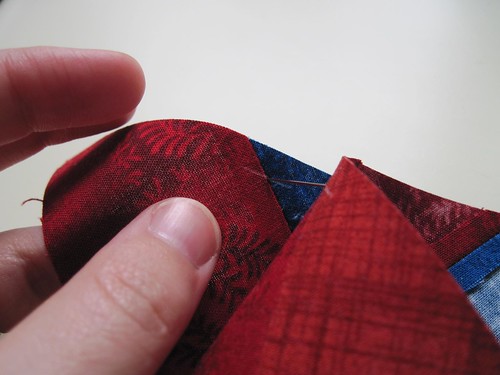
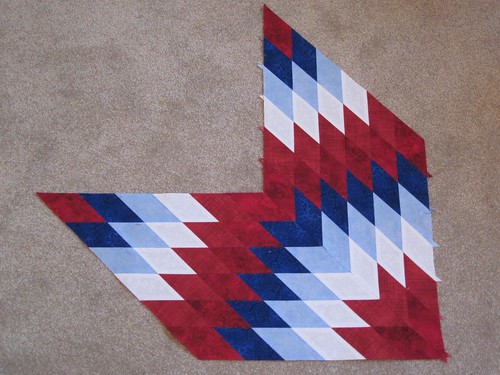
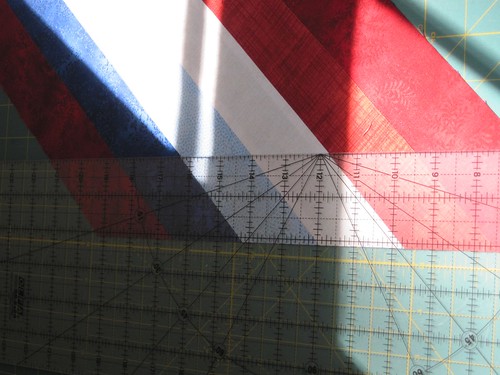
Here's what the finished diamonds look like (these two are already sewn together):
Once you have your strips cut from your fabric, cut the strips in half at the fold such that the length of your strip is approximately 22" vs the full width of fabric. This will make handling the sewn strips and pressing them easier.
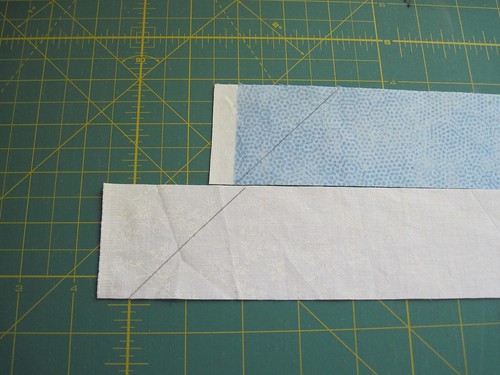
Line up your ruler on the 45-degree mark and draw a line as close to the end of the strip as possible. This is just a guide for being able to offset the strips the correct amount.
Draw the lines on all of your fabric strips.
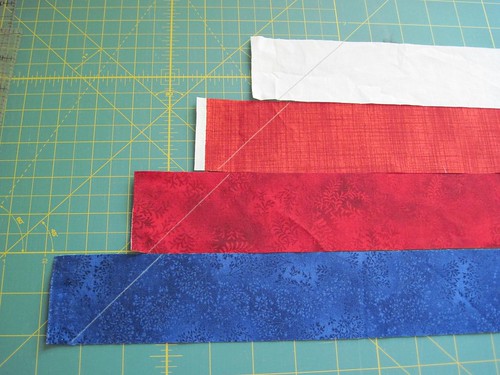
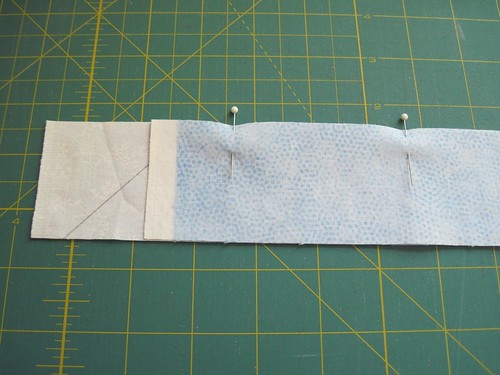
To sew two strips together, you will want to offset them (see picture below). This will minimize fabric waste as later on you will need to cut strips at a 45-degree angle. When I offset my strips, at the upper right corner of the drawn line, I put a mark approximately 3/8" away from the end of the draw line. I then matched the drawn line on the 2nd piece (blue) with the 3/8" mark on the white piece. This 3/8" overlap ends up with the drawn lines almost perfectly in line.
After you've offset your strips, flip the top one (blue) down onto the lower one (white). I used two pins just to hold the two strips in place at the beginning of sewing. You don't need to pin the entire length of the strip. This was just useful for me such that the strips wouldn't shift between my cutting mat and taking it to my sewing machine.
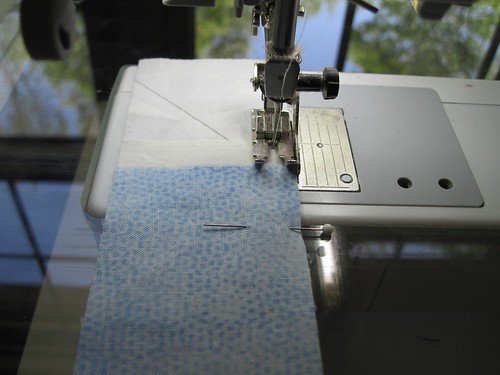
Take the pinned strips to your sewing machine and sew a 1/4" seam along the length of the strip.
After you've sewn your pairs of strips together, press all seams open. I don't normally like to press seams open and I try to avoid it wherever possible. However, you will definitely want to press them open for this design. If you don't, you will have a VERY thick seam at the center of the star that will be very difficult to quilt or to get to lay flat.
Continue sewing the pairs of strips together (make sure you have the order correct - trust me - I've made this mistake and had to rip out seams) and pressing the seams open until you have a strip set with all of your colors together. (just a note - I know the colors of the strips above are in a different order than the pictures below. When I took pictures, they were taken while making different strip sets; hence the difference in the color order.)

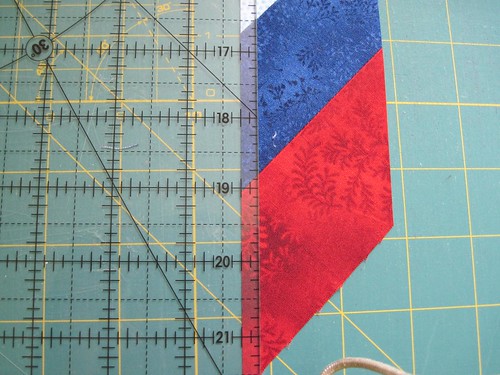
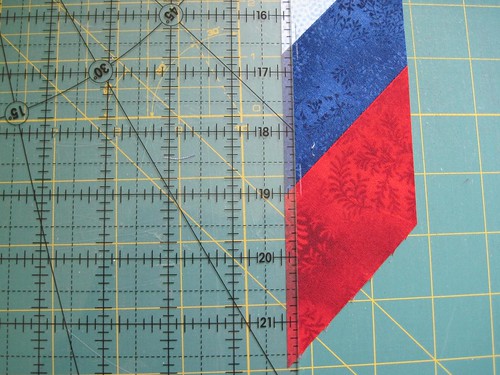
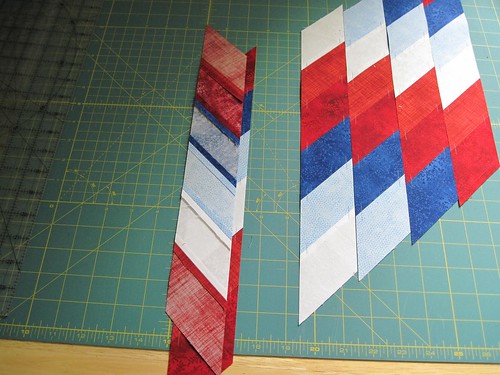
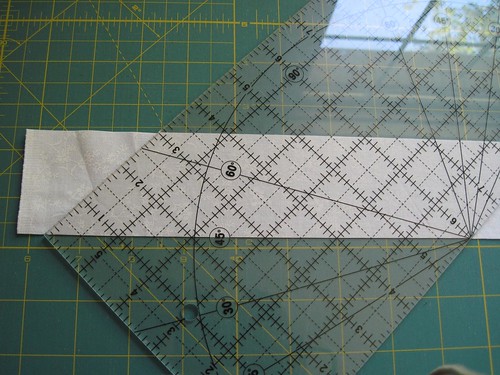
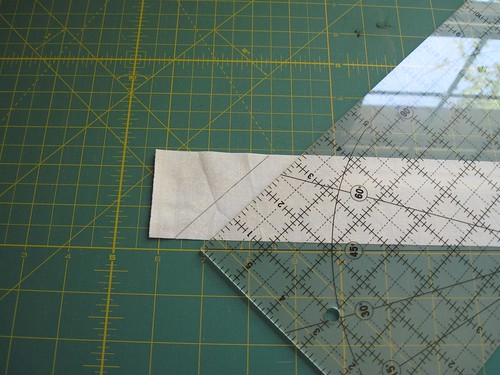
Once you have your full strip set, take it to your cutting table and line up your ruler at a 45-degree angle to the length of the strips.
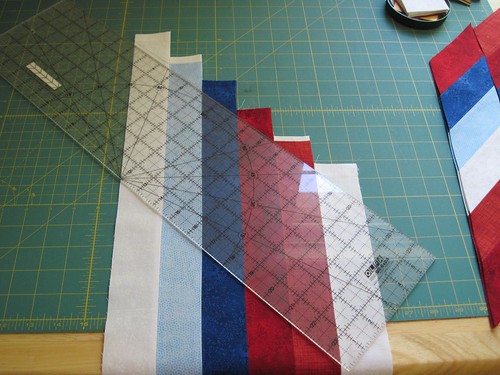
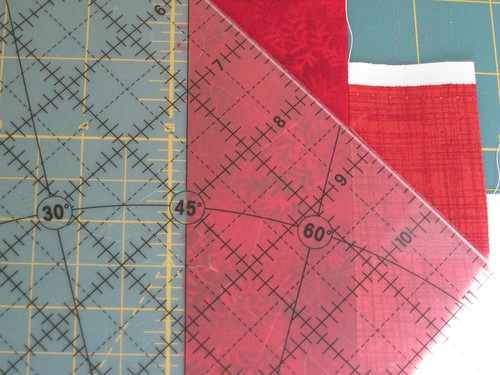
Make your initial cut to get a straight edge at a 45-degree angle along the set of strips. Once that is done, turn your strip set and line up your ruler as shown below. Since our original strips were cut 2-1/8" wide, when we cut these "strips", they also need to be 2-18" wide. If you chose to cut your strips either wider or narrower, you just need to remember to cut these strips at the same width as your original strips.
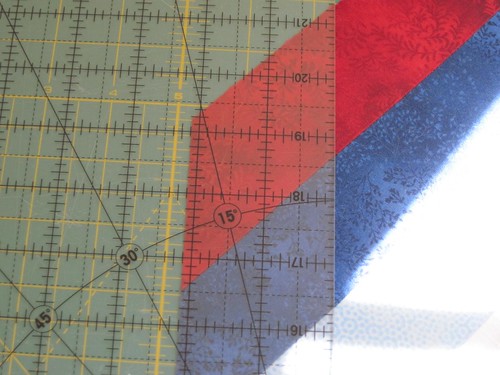
Follow the above strips until you have made strip sets for all the sections in your diamond.
Next week, I will post the next set of directions on how to sew these cut strips together to actually make the diamond shape.
Happy Crafting!
~Sarah at upstateNYCreations
This quilt is going to be 67" x 67" when finished. I will post a picture of what the overall design will look like later. The center portion is approximately 48" square (if I recall correctly). I don't remember exactly what the fabric requirements are, but I can give more details on the size of the finished items if people are interested.
Here's what the finished diamonds look like (these two are already sewn together):
As you go through the steps below, you will need to create several strip sets in different color orders to achieve the design. Using the diamonds and colors in the pictures above the strip sets are as follows:
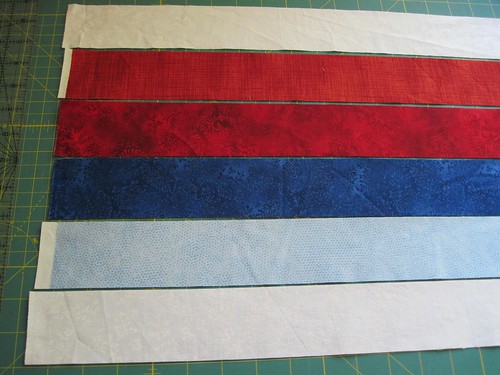
Strip 1 -- dark red, light red, white, light blue, dark blue, dark red
Strip 2 -- light red, white, light blue, dark blue, dark red, light red
Strip 3 -- white, light blue, dark blue, dark red, light red, white
Strip 4 -- light blue, dark blue, dark red, light red, white, light blue
Strip 5 -- dark blue, dark red, light red, white, light blue, dark blue
Strip 6 (same as strip 1) -- dark red, light red, white, light blue, dark blue, dark red
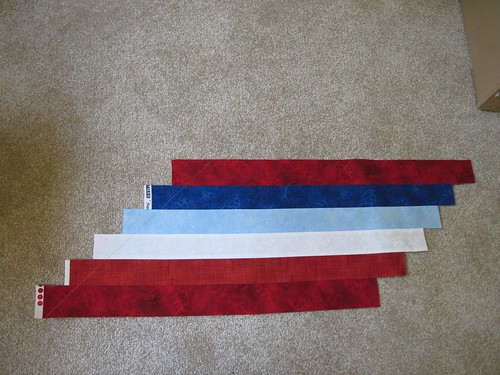
To make this quilt, I'm using 2-1/8" wide strips in 5 colors:
Once you have your strips cut from your fabric, cut the strips in half at the fold such that the length of your strip is approximately 22" vs the full width of fabric. This will make handling the sewn strips and pressing them easier.
Line up your ruler on the 45-degree mark and draw a line as close to the end of the strip as possible. This is just a guide for being able to offset the strips the correct amount.
Draw the lines on all of your fabric strips.
To sew two strips together, you will want to offset them (see picture below). This will minimize fabric waste as later on you will need to cut strips at a 45-degree angle. When I offset my strips, at the upper right corner of the drawn line, I put a mark approximately 3/8" away from the end of the draw line. I then matched the drawn line on the 2nd piece (blue) with the 3/8" mark on the white piece. This 3/8" overlap ends up with the drawn lines almost perfectly in line.
After you've offset your strips, flip the top one (blue) down onto the lower one (white). I used two pins just to hold the two strips in place at the beginning of sewing. You don't need to pin the entire length of the strip. This was just useful for me such that the strips wouldn't shift between my cutting mat and taking it to my sewing machine.
Take the pinned strips to your sewing machine and sew a 1/4" seam along the length of the strip.
After you've sewn your pairs of strips together, press all seams open. I don't normally like to press seams open and I try to avoid it wherever possible. However, you will definitely want to press them open for this design. If you don't, you will have a VERY thick seam at the center of the star that will be very difficult to quilt or to get to lay flat.
Continue sewing the pairs of strips together (make sure you have the order correct - trust me - I've made this mistake and had to rip out seams) and pressing the seams open until you have a strip set with all of your colors together. (just a note - I know the colors of the strips above are in a different order than the pictures below. When I took pictures, they were taken while making different strip sets; hence the difference in the color order.)
Once you have your full strip set, take it to your cutting table and line up your ruler at a 45-degree angle to the length of the strips.
Make your initial cut to get a straight edge at a 45-degree angle along the set of strips. Once that is done, turn your strip set and line up your ruler as shown below. Since our original strips were cut 2-1/8" wide, when we cut these "strips", they also need to be 2-18" wide. If you chose to cut your strips either wider or narrower, you just need to remember to cut these strips at the same width as your original strips.
Follow the above strips until you have made strip sets for all the sections in your diamond.
Next week, I will post the next set of directions on how to sew these cut strips together to actually make the diamond shape.
Happy Crafting!
~Sarah at upstateNYCreations
Monday, June 4, 2012
Make-a-List Monday
I think I did a bit better last week in terms of completing my goals.
Here's the list from last week:
1. Post directions for table runner. DONE!
2. Post for Wanna-Know-Wednesdsay. DONE!
3. Share pictures of Lone Star Wall Hanging. DONE!
4. Setup area in sewing room for scraps. Not done.
5. Share pictures of planting bed. DONE!
Overall, I did pretty well. The only thing I didn't do last week was getting an area setup in my sewing room for scraps. However, I did spend a few hours with Rich planning out how to make a good design wall. We're going to use two 1/4" thick pieces of plywood (very cheap) and then adhere 1/2" thick cork board to the front of it. Once we have the plywood and cork board installed, I will then wrap the entire front of the "wall" with a fabric design wall (flannel-type material). This will allow a surface that will have the fabric pieces "stick" to it as well as giving a spongy surface underneath for pinning if I need it.
We're actually going to use two 4 x 6 foot pieces of plywood and install them on the wall right next to each other. This way, we can assemble the wood and cord in the basement and only move it upstairs once we're ready to wrap it in fabric. If I tried to make one huge continuous wall, we'd have to assemble it in my sewing room, which would equate to a mess (due to the adhesive and sawdust) along with not letting me sew for a while due to the mess.
So what's in store for this coming week?
1. Post for Wanna-Know Wednesday.
2. Share more pictures of Lone Star Wall Hanging.
3. Post initial set of directions on how to make a Lone Star quilt.
4. Purchase materials for design wall.
5. Quilt small "mug rugs" that I've had made for a while.
Happy Crafting!
~Sarah at upstateNYCreations
Sunday, June 3, 2012
Stashbusting 2012 - Week 20-23
Its been a few weeks since I last posted for Stashbusting, but I have been able to get some sewing done. I completed all the piece parts for Bonnie Hunter's pattern "Orca Bay". I put it aside for a little while though to start working on a wall hanging for the house.
The wall hanging is going to be a Lone Star pattern. After a slight fumble the first time I tried to make the full diamond, I was able to get the hang of it. I have four diamond pieces made so far, but here's what they look like as a sewn pair.
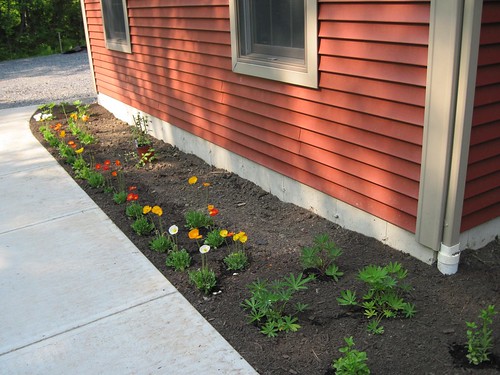
We've also been busy the past few weeks with our garden and house things. We took almost a full week off from work during the Memorial Day Holiday and were able to get our front planting bed mostly planted. We are still waiting for some of the flowers to arrive, but we had to dig out 8 yards of sand, replace it with 8 yards of good topsoil and then start planting. So far there are 55 plants in the bed with another 12 on the way. Here's what it looks like:
If you couldn't tell, we really like poppies. :-)
We've also been building a dam in a small stream on our property. We have a pump near it and are able to use the water in the reservoir to water our lawn. Considering we're on a well, we're very happy to be able to use the water in the stream to water the lawn versus our only potable water.
Here are the numbers:
Added This Week: 0.0 yards
Added Year to Date: 15.54 yards
Used This Week: 2.44 yards
Used Year to Date: 12.62 yards
Net Year to Date: 2.93 yards
Almost in the black again! It shouldn't take long to get back to neutral or even use more fabric than I've purchased! ;-)
The wall hanging is going to be a Lone Star pattern. After a slight fumble the first time I tried to make the full diamond, I was able to get the hang of it. I have four diamond pieces made so far, but here's what they look like as a sewn pair.
We've also been busy the past few weeks with our garden and house things. We took almost a full week off from work during the Memorial Day Holiday and were able to get our front planting bed mostly planted. We are still waiting for some of the flowers to arrive, but we had to dig out 8 yards of sand, replace it with 8 yards of good topsoil and then start planting. So far there are 55 plants in the bed with another 12 on the way. Here's what it looks like:
If you couldn't tell, we really like poppies. :-)
We've also been building a dam in a small stream on our property. We have a pump near it and are able to use the water in the reservoir to water our lawn. Considering we're on a well, we're very happy to be able to use the water in the stream to water the lawn versus our only potable water.
Here are the numbers:
Added This Week: 0.0 yards
Added Year to Date: 15.54 yards
Used This Week: 2.44 yards
Used Year to Date: 12.62 yards
Net Year to Date: 2.93 yards
Almost in the black again! It shouldn't take long to get back to neutral or even use more fabric than I've purchased! ;-)
Subscribe to:
Posts (Atom)