Showing posts with label tips. Show all posts

Wednesday, April 30, 2014

More Partial Seams

I'm finally getting around to the continuation of my last post on partial seams.  The prior post can be found here.  These pictures are all from the Jambalaya quilt pattern that I'm putting together with some quarter yard cuts of material that I got a year or so ago.

Once you have your columns sewn together as shown in last post, you'll want to put two of the columns next to each other so you can visualize how they nest together.
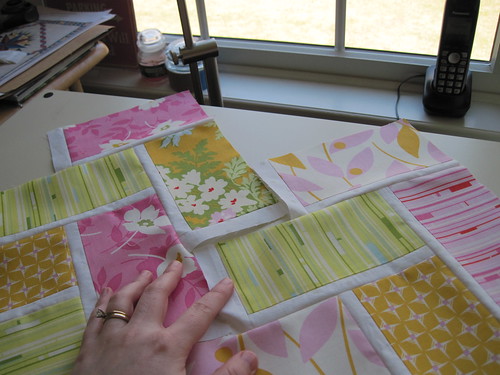
Jambalya 17

Flip the piece on the right over onto the left.  Take a look at the fabric placement in the above photo compared to that in the below photo.  The column on the left is stationary, the column on the right is flipped right sides together with the pink/white/orange piece on top of the mainly orange piece from the left.  I pin these seams to keep things aligned a bit better as I move things around.
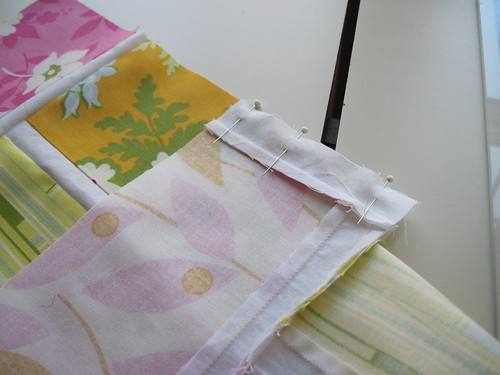
Jambalya 18

On this top section, you want to start with another partial seam.  The picture below shows my stitching line starting about 1" from the edge of the seam.  The line is sewn all the way to the free end.  This is the only partial seam you will need.  The rest of the seams are full seams.
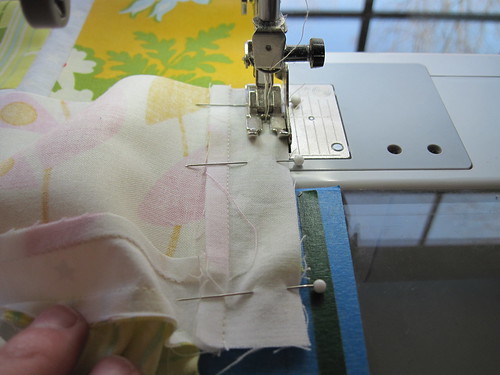
Jambalya 19

Here is what it looks like after that first seam is completed.  The next step is to sew the yellow striped fabric to the free side of the orange piece from the first seam.  Again,  I've found it easier to pin the seams to keep things aligned.
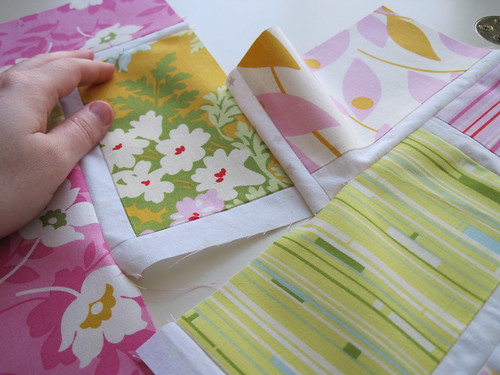
Jambalya 20

Here is a picture of the next seam ready to be sewn.  The yellow strip piece is now laying on top of the orange piece.  Sew this as a full seam.
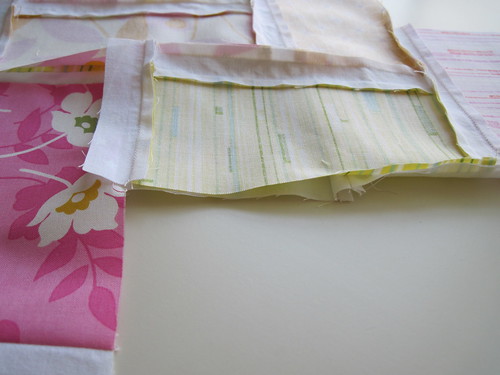
Jambalya 21

Keep sewing the seam (all of the full) until you get to the bottom of the column. There's no need to press between each seam you sew.  Simply finger press the seams enough to allow you to sew the next seam and then do a full press once you're done with the column.  Its easiest to press from the back side first to get the seams going in the direction you want them to go.  Once you have that done, you can do a good hard press from the front side.

I don't currently have a picture of the finished columns, so you'll have to trust me that its done. ;c)  The partial seams aren't too bad once you get accustomed to the method of doing them.  The only downside I found was that there was a lot of stopping and starting.  I keep a pile of squares next to my machine for a scrap quilt and used those to maintain my line of stitching as much as possible.  So the benefit was that I got a lot of these pieces sewn together when making this quilt.  LOL!


Happy Crafting!
~Sarah at upstateNYCreations

Wednesday, January 30, 2013

Starting and Ending a Line of Quilting

I thought I would do a post on starting and ending a line of quilting and being able to bury the thread afterwards.  Clicking on any of the pictures will take you to my Flickr site and you can view the picture larger.

When starting the thread, first you want to put your needle down where you want to start your quilting.

IMG_2021

Be sure to keep a tight hold of the thread that comes from your needle and raise the needle to the up position again.

IMG_2022

Gently tug on the thread until the bobbin thread comes up.  You can see it as a little loop in the picture below.  Use a stylus, pin, pencil (pretty much any small tool) and slip it through that loop to pull the thread out from under the needle.

IMG_2023

Hold onto both ends of the thread and make sure you have some tension on both of them to prevent them from getting pulled to the wrong side of the fabric.

IMG_2024

Again, put your needle down in the spot where you want your quilting to start.  Put your pressure foot down and hold onto those threads and start stitching.  Once you have a few stitches taken, you don't need to hold onto the threads any longer.

IMG_2025

When you get to the end of the line of stitching, we will follow a similar process.  When you are the end of stitching, put the needle in the up position, raise your pressure foot and use a small tool of some sort to catch your top thread between the quilt and the needle.  Pull that thread to the side and grab onto it with your hand.

IMG_2026


While holding that thread, put your needle back down in the last place you took a stitch. 

IMG_2027

Raise the needle to the up position again and pull gently on your thread.  The bobbin thread should come to the top fairly easily.  You will want to leave your pressure foot down on this step to prevent the top thread from pulling through.

IMG_2028

Again, use a stylus or small tool to grab that loop of thread and pull it to the side.

IMG_2029

Gather both the top and bottom threads and snip them.  Be sure to leave enough thread such that you can tie a knot in it.

IMG_2030

Move your quilt sandwich away from the pressure foot and tie a knot close to the surface.  You will want to leave a little space so you can pull the thread between the layers of the quilt.

IMG_2031

I use a self-threading needle to do this step as it makes it easy to thread.  Thread the needle and insert the tip as close as you can to your line of stitching and the point should come up about a half inch to an inch away from your stitching.  You will want to make sure you only get your needle under the top layer of fabric.  it doesn't need to go into the batting and you definitely don't want it going all the way through your quilt.

IMG_2032

Pull the needle through.  If you look closely at the picture below, in the corner of the stitching, there is a little "ball" of thread. That's my knot.  Pull gently, but firmly, on your thread and it will pop through the top layer of fabric.  You will actually feel a little "pop" when it goes through.

IMG_2033

In this picture, if you look at the same corner again, the "ball" of thread is missing.  It is buried under that top layer of fabric.  Now just snip that thread tail close to the surface of the quilt and you are done.

IMG_2034

I hope you found this helpful!


Happy Crafting! ~Sarah at upstateNYCreations

Wednesday, August 15, 2012

Wanna Know Wednesday - Scraps

Do you ever wonder what to do with leftover pieces of fabric from a quilt?  I know some quilters are very big into scrap quilting and will save every little smidgen of fabric for use in some future project.  I did this for a while and found that I had piles of little pieces that I couldn't figure out anything to do with.  Now I'm talking little...as in strips less than 3/4" wide, or pieces less than 1" square.

I've definitely learned that keeping those tiny pieces just don't work for me.  I do keep a small jar of those pieces and use them strictly for cleaning lint off my machine or wiping up drops of oil from oiling my machine.  That's about the most I get out of them.

What I have found that works for me is to actually "plan" for a scrap quilt.  When I have an idea in my head of what I want something to be or a quilt pattern that I want to make, I jot down the size pieces that I would need to make that quilt.  Then as I finish up an existing quilt, I cut up the leftover fabric into pieces to fit the scrap quilt pattern.

The first "planned" scrap quilt is actually very basic.  Its just leftover 2.5" squares and I just sew them into groups of 16.  Once I have enough blocks amassed, I will make them into a quilt top.  Since I always have leftover binding and I cut my binding at 2.5" strips, I just trim all that leftover down into squares.  All the squares are kept in one plastic bin and I semi-randomly pull out pieces (I usually make sure that no single 16-patch block has two of the same fabric).


Scap_Quilt-1

Scrap_Quilt-2

I use these 2.5" squares to be my "leaders and enders" such that I never have to waste stitches on a scrap piece of fabric.  So far, I've amassed 70 of these blocks and I need to get to 99 blocks for the center of a over-sized Queen quilt.

One of the things I really like about this is that I have squares from EVERY quilt that I've made so far.  While I look at my blocks that I've made so far, I can pick out the fabrics and know exactly which quilt that fabric came from and who has the quilt now.  It is sort of like a trip down memory lane.

I think I'll post some more about handling scraps in the future as it seems like its a never-ending "problem" for quilters. ;-)

Happy Crafting!
~Sarah at upstateNYCreations

Wednesday, August 1, 2012

Wanna Know Wednesday - Thread Conditioner

A few weeks ago I was browsing my local quilt shop (yes, a very dangerous situation...at least for my wallet) and saw a small box of Thread Heaven thread conditioner.  

Thread_Heaven

 I had heard about this stuff being recommended by a few sewers (both quilters and non-quilters) and they all loved it.  Basically, this thread conditioner will help prevent fraying and tangling of your thread while sewing.  If you want to know all the details, please see Thread Heaven's website.

I have to say that even though people talked about this product, I was skeptical of it.  It doesn't seem difficult to do hand-sewing the way I have been doing it without any thread conditioner, so why would this product be worth the price or effort to use?

This little baby is a miracle worker!  I decided to just try it since it was not expensive (I think I paid less than $4 for the container).  I used it to hand-sew the label below.

Shine_on_Bayou_Cane-7

It was SO incredibly easy to pull the thread through the fabric.  It was very close to putting a hot knife through soft butter.  It was amazing!  I've been doing hand-sewing for a while and never has it been this easy to stitch through thick cotton fabric.  I am definitely a believer in this stuff now.

I would highly recommend using this product if you are doing any kind of hand-sewing.  While the company says that the product can be used on needlepoint without any damage, I am hesitant to use it on my needlepoint.  My needlepoint projects take years to complete because they are so large, and the last thing I want is to use a product and have it stain the fabric on me when its something I do not intend to wash.  I do plan on contacting the company though to see what kind of testing they have done.

By the way - I have not been paid by the company or contacted by the company to review this product.  This is just something that I had heard about and tried and found it to be very useful.

Happy Crafting!
~Sarah at upstateNYCreations

UPDATE:  I just finished reading an email from the Thread Heaven folks and they re-assured me that Thread Heaven is safe for the needlepoint that I do.  In fact, they said: "Smithsonian has used Thread Heaven on the hand embroidered tapestry "seals" for presidents Clinton, Bush, and Obama, and even though presidents come and go, the tapestries are meant to last!"  The Thread Heaven product will help protect the thread from UV exposure and other things that will "age" it.

Wednesday, July 18, 2012

Wanna Know Wednesday - Quarter Square Triangles

After posting a few Wednesdays with the Lone Star tutorial, I'm finding it hard to determine something to write about this week.  It is hard to follow-up a tutorial!  I think this will be a simple post on Quarter Square Triangles to go with my Half Square Triangles post.

The traditional way to make QSTs is to add 1.25" to the finished size of your square.  For example, if you want a 3" finished QST block, you'll want to cut your squares at 4.25".  Unlike the HSTs where you traditionally added 7/8", adding 1.25" is an easy measurement on a ruler.  However, many times I still find that my QSTs are just a tad bit smaller than I wanted them to be.

The method I've found that works quite well is to add 1.5" to the finished size of my square.  If I want a 3" finished QST block, I'll cut my squares at 4.5".  Once your block is sewn together, its a little on the large side, but its so much easier to cut excess material off than to try to add material back onto the square.

This method is a tiny bit wasteful (all those little pieces being trimmed off), but for my own sanity, its definitely worth it!  Having blocks the right size makes it a lot easier to assemble your quilt top...and limits the amount of tears shed! :-)

Here are the steps for creating these quarter square triangles:

  1. Cut your light and dark squares 1.5" larger than your finished size of the square.
  2. Draw a diagonal line from one corner of the square to the other of the light material.
  3. Layer 2 squares (one light and one dark) with right sides together and sew a scant 1/4" away from the diagonal line that you drew.
  4. Press the entire square before cutting it apart in order to set the stitches.
  5. Cut your squares apart on the diagonal line that you drew (this cut will be between the two stitched lines).
  6. Press seams towards the dark material.  At this point, you will have two squares that look like half square triangles.
  7. Line up two sets of the half square triangles and layer them together such that when you sew your next seams, it is perpendicular to your pressed seams.  
  8. Pin the blocks together such that they won't shift during sewing.
  9. Draw a diagonal line from one corner to the other of the top square.  
  10. Sew a scant 1/4" away from the diagonal line.
  11. Press the entire square again before cutting it apart in order to set the stitches.
  12. Cut your square apart on the diagonal line that you drew (this cut will be between the two stitches lines).
  13. Press seams toward one side.
  14. Trim the excess material off the block to make sure that it is perfectly square and you'll have two quarter square triangles.

Below is a table of example sizes of finished squares and what size square you need to cut to achieve that final size.


Finished Size of Square
Cut Size of Squares
1.5”
3.0”
2.0”
3.5”
2.5”
4.0”
3.0”
4.5”
3.5”
5.0”
4.0”
5.5”
4.5”
6.0”
5.0”
6.5”

Happy Crafting!
~Sarah at upstateNYCreations

Wednesday, July 11, 2012

"Wanna Know" Wednesdsay - Lone Star Tutorial Part 3

I've been a little lax in posting the rest of the tutorial for creating a Lone Star Quilt.  Work and life have been ultra busy.  However, here is the conclusion of how to make a Lone Star Quilt.

 Last time, we left off with each of the individual diamond sections being made.

Lone_Star-A

To sew the individual diamond sections together, we are using the same methods as before.  Simply mark your 1/4" seam allowance on the intersection points and pin together and then sew.  Its easiest to sew them into sets of two, then into four such that you have an upper half and lower half to the star.  Then sew the two halves together.

When sewing the two halves of the star together, the most critical part is the center.  You want to make sure that your seam intersects the points of all eight diamonds coming together.  Note in the picture below that my seam intersection is marked right at the point where all the diamonds come together on one half.

Lone_Star-18

Pin the seams just like the previous steps and then press the seam open in the end.

My Lone Star was by no means perfect.  I had a small "poof" in the middle, but it wasn't too awful.  It will easily flatten out without any problems once it is quilted.  If you've paid attention to your seams and not distorting fabrics too much, you shouldn't have any problems.

The final "difficult" step in this project is to add the corner squares and triangles.  This is where you have to sew some Y-seams.  This is the first time I've machine sewn a Y-seam, and to be honest, it wasn't too bad as long as I paid attention to pinning things before I started sewing.

First, layout your quilt with one of the triangles in place.  This is critical to make sure you sew the right edges together between your star and the triangle.

Lone_Star-19

Once that is done, flip the triangle over to sew the first seam.  You will want to mark 1/4" in from the inside corner to make sure you don't sew too deeply into the Y.

Lone_Star-20

Lone_Star-21

Lone_Star-22

Press your seam towards the lone star and away from the triangle.  This definitely helps with the bulk of the seam at the deepest part of the Y-seam.

Once you have all the squares and triangles set in, you can add borders if you decide to make your quilt larger. I had two borders to add to the outside of my star to end up with a quilt that is 67" square.
Lone_Star-17

I actually enjoyed making this quilt and didn't have a lot of problems with it.  My husband is already wanting me to plan another one for the foyer in the house.  I still have to finish quilting this one though!

If anyone has questions or comments about these tutorials, please feel free to comment on this post or to email me.

Happy Crafting!
~Sarah at upstateNYCreations

Wednesday, June 13, 2012

"Wanna Know" Wednesdsay - Lone Star Tutorial Part 2

Its Wednesday again, which means its time for the next installment of how to make a Lone Star quilt.  I apologize to anyone who is on a dial-up connection as this is definitely a picture-heavy post.

Last time, we left off with having all of the strips cut at a 45-degree angle and laid out in the order needed for assembling the diamonds.

Lone_Star-O

The next step is to mark your seam intersections.  Now...I know you really don't want to mark all these strips....but trust me, its definitely worth the extra time to mark everything.  I learned this the hard way (don't even ask how many times I had to rip out seams to get these right).

So take your ruler and line up your 1/4" mark next to the edge of the fabric.  The key thing is that you want the actual 1/4" line to the left of the fabric as shown in the picture below.  This will make sure that your marks aren't visible once you sew the pieces together.

Lone_Star-1

Below you can see where I marked just the intersection points between the fabrics.  You don't need to draw a line along the length of the strip.  You just need it where a seam exists.

Lone_Star-2

Here's another picture with both light and dark marks (sorry about it being sideways).

Lone_Star-3

Mark both sides of all of your strips as shown in the pictures below.

Lone_Star-4

Up close showing the seam intersections:

Lone_Star-5

Lone_Star-6

Once you have all your seams marked, take your strip on the right side of a pair, and flip it over the first strip.
Lone_Star-7

Lone_Star-8

Now its time to start pinning.  Take the top strip and place a pin from back to front.

Lone_Star-9

Make sure the point of the needle pokes out through the marked intersection.
Lone_Star-10

Next, with the same pin, but the point of the pin through the marked intersection on the bottom strip.
Lone_Star-11

Insert these "vertical" pins through every intersection along the strip.
Lone_Star-12

Once you have all the vertical pins placed, shift the fabric around such that the pin is perfectly straight and the top edges line up as closely as possible.  Then take two other pins and pin on both sides of your intersection pin.
Lone_Star-13

Do this for the entire strip.
Lone_Star-14

Once you have the second set of pins in place (on both sides of the intersection pin), you can remove the intersection pin.  I also placed a halfway between the end of the strip and the first intersection.  This is just to help keep the fabrics aligned when I start to sew the strip.
Lone_Star-15

Go ahead and sew all those strips together and remove the pins as you are sewing.  Press your seams open and keep repeating the steps above until you have a full diamond sewn together.  I don't have a picture of a single diamond together, but just imagine that the pair below are separate. ;-)

Lone_Star-A

Next week, I'll show how to sew the diamond sections together to achieve the Lone Star shape in the middle.

Happy Crafting!
~Sarah at upstateNYCreations

Wednesday, May 30, 2012

"Wanna Know" Wednesday


For this week's "Wanna Know" Wednesday, I've decided to post directions on how to make a Spinning Star Table Runner.  Here's the finished piece:

Table_runner-A


Spinning Star Table Runner

Fabric Requirements:
-          1/2 yard Neutral
-          3/8 yard Green
-          3/8 yard Blue
-          1/2 yard Red

-          1/3 yard for binding (2.5” wide, double-fold)
-          1.5 yards for backing (no seams; 1 yard with seams)

* assumes 40” wide fabric

Cutting Directions:
-          Neutral
o   (A) – Cut two (2) strips 4.5” wide.  Cut twelve (12) 4.5” squares from the strips, save the remainder of the strip.
o   (B) – Using the leftover portion from step (A), trim the remainder down to 3-5/16” wide.  Cut three (3) 3-5/16” squares.
o   (C) – Cut one (1) strip 5.25” wide.  Cut three (3) 5.25” squares.  Then cut these on the diagonal twice to end up with twelve (12) smaller triangles.
-          Green
o   (D) – Cut one (1) strip 3” wide.  Cut six (6) 3” squares.  Then cut these on the diagonal once to end up with twelve (12) smaller triangles.
o   (E) – Cut four (4) strips 2.5” wide for borders.  From one strip, cut two (2) rectangles measuring 2.5” x 16.5”. 
o   (F) – From the remaining three strips from step (E), cut/piece the strips to obtain two (2) rectangles measuring 2.5” x 48.5”.
-          Blue
o   (G) – Cut one (1) strip 5.25” wide.  Cut three (3) 5.25” squares.  Then cut these on the diagonal twice to end up with twelve (12) smaller triangles.
o   (H) – Cut four (4) strips 2.5” wide.  Cut ten (10) rectangles measuring 2.5” x 12.5” for sashing.
-          Red
o   (J) – Cut one (1) strip 5” wide.  Cut six (6) 5” squares.  Then cut these on the diagonal once to end up with twelve (12) smaller triangles.
o   (K) – Cut one (1) strip 2.5” wide.  Cut eight (8) 2.5” squares for setting squares.
-          Binding
o   (L) – Cut four (4) strips 2.5” wide.  Piece strips into one continuous strip for binding.

Sewing Directions:
1.       Square-in-square blocks – Make 3 total.
a.       Take the 3 part (B) neutral 3-5/16” squares and the 12 part (D) green small triangles.
b.      Sew one (D) triangle to one of the edges of a (B) square.  Press seam towards the darker color.
c.       Sew one (D) triangle to the opposite edge of the (B) square.  Press seam towards the darker color.
d.      Sew two remaining (D) triangles to the remaining edges of the (B) squares.
e.      Continue for all three blocks.  Final blocks should measure 3.5” square with seam allowances.

2.       Three-quarter blocks – Make 12 total.
a.       Take the 12 part (G) blue triangles and the 12 part (C) neutral triangles.
b.      Match up edges of the blue and neutral triangles to form one larger triangle.  Sew and press seam towards the blue triangles.
c.       Take the 12 part (J) red triangles and the pieced triangles from step 2b.  Sew long edges together and press seams towards the red triangles.
d.      Continue for all 12 blocks.  Final blocks should measure 3.5” square with seam allowances.
3.       Assemble Spinning Star Blocks – Make 3 total.
a.       Layout sewn pieces from steps 1 and 2 along with 12 part (A) neutral squares.  Arrange in the pattern shown.
b.      Sew pieces into three strips, pressing seams as follows:
                                                               i.      Top & bottom rows – press towards three-quarter block.
                                                             ii.      Middle row – press towards three-quarter block (red).
c.       Sew rows together.  Press seams towards top and bottom rows (away from the square-in-square block).
d.      Continue for all three blocks.  Final blocks should measure 12.5” square with seam allowances.
4.       Assembly
a.       Take four part (H) blue sashing strips and assemble the strips with the Spinning Star Blocks to create one long row.  Press seams towards blue sashing.
b.      Take four part (K) red squares and three part (H) and sew together to create a long strip.  Repeat to make the 2nd long strip.  Press seams towards blue sashing.
c.       Take the two long strips from step 4b and sew to the long strip of Spinning Star Blocks from step 4a.  Press seams towards the outer strips.
d.      Take two part (F) border strips and sew to the top and bottom of the sashed block section.  Press seams toward border strips.
e.      Take two part (G) border strips and sew to the sides of the sashed block section.  Press seams towards border strips.
5.       Finishing
a.       Layer quilt with backing and batting material and quilt as desired.
b.      Trim quilt top to be square.
c.       Sew binding (L) onto quilt top per usual method.


Happy Crafting!
~Sarah at upstateNYCreations

Wednesday, May 2, 2012

"Wanna Know" Wednesday - Perfect Corner Binding Tutorial

In 2010, I took a quilting class (even though I already knew how to quilt and bind a quilt) and learned a new technique for getting the corners of binding JUST right.  Hopefully the pictures and text will be good, as this is the first time I'm trying to do something like this.

 First, you want to start out machine stitching your binding to the quilt top.  The example I have below is for a double-fold binding where I cut the strips at 2.5" wide.  My seam allowance is a little more than a 1/4" as I wanted the binding to be really full.  However, this technique works for any size binding...any seam allowance (and no math involved).

So line up your raw edges of your fabric to the raw edge of the quilt and start stitching with the desired seam allowance.
Binding_Tutorial-A

As you get closer to the corner, you'll want to stop stitching to setup for stitching to the corner.  Now, most binding tutorials have you measure from the corner back towards your needle and make a mark to define where to stop stitching.  The distance from the corner is the width of your seam allowance.  The way this technique works is that before you get to the corner, stop stitching.  Take your folded binding and fold it straight up towards your walking foot.  You'll want the folded edge of the binding at the edge of the corner of the quilt.

Next, while holding your binding folded upwards towards your walking foot, fold the binding again at a 45-degree angle towards the left.  Take a look at the picture below.  I've placed a pin in the folded section to help hold it in place while taking a photograph.  You should be able to see the folded piece that makes the 45-degree angle.

Binding_Tutorial-B
Next, while holding the binding in place, start stitching again and stitch as close as you can to that 45-degree line.  When I get within a stitch or two of the fold, I usually stop the foot pedal and I manually advance the machine with the hand-wheel.  I haven't had the needle catch the fold yet, and I hope it never does! :-)  The picture below will show how close I get to the folded section.

Binding_Tutorial-C

Because we stopped EXACTLY where the 45-degree angle was, we automatically stop at a distance that's the same as our seam allowance from the edge of the quilt.  It works EVERY time.  I've tried it with up to a 1/2" seam allowance and I still got a perfect corner.

Once you get to the folded section, lift up the pressure foot and let the folded piece go straight again.  Back-stitch with your needle to secure the stitches and cut your threads.

Next, fold your binding upwards like the picture below.  This is how you "normally" do the binding corner.

Binding_Tutorial-D
Once its folded upwards on the 45-degree angle, you can fold the binding straight down towards you.  The raw edge of the binding should be lined up with the raw edge of the quilt.  Here's a close-up of the corner.  I usually use some straight pins to hold things in place until I start stitching.
Binding_Tutorial-E

Finally, start stitching again by placing your needle in at approximately the location where the 45-degree angled piece starts underneath.  It doesn't matter if you're a little over it, but I've found that if I start stitching from the edge, it makes it hard to turn the binding when I hand-sew it to the back.

Binding_Tutorial-F


Hopefully this was easy enough to follow.  If anyone does run into problems (or has questions), feel free to contact me.